Saturday, March 27, 2010

EVOLUTION OF A COLORWAY


About this time of year our southern longleaf pine trees begin to shed their fuzzy pollen bearing thingies. My Aunt, who was a botanist, informed me these are called catkins. I picked up a few one day, and loved the play of colors: yellow-orange through scarlet, magenta, violet, and lavender. I had to get those colors onto yarn!


I wound some Patons Kroy sock yarn into big skeins, since the dye won’t really penetrate a ball of yarn very well. This yarn is 75% wool and 25% nylon. You can try this at home, but don’t try with any yarns less than 50% wool or the colors will be very pale.


The wool skeins must be soaked (preferably overnight) to get them thoroughly wet, then swooshed around in a mixture of an ounce or two of vinegar to a gallon of water. Next they can be gently squeezed out (or spun in the washing machine) and placed on a surface for dyeing. I like to use the cheap plastic “Mexican hat” dishes designed for chips and dip. (I don’t put food in them afterwards!) The dye is placed on the wool, and gently squished around with a gloved hand. In this photo I used Wilton icing dyes, which come as a paste in little vials. The colors are very vibrant, but will fade and wash out over time. I use commercial acid wool dyes now, which are quite toxic to work with but much more permanent.


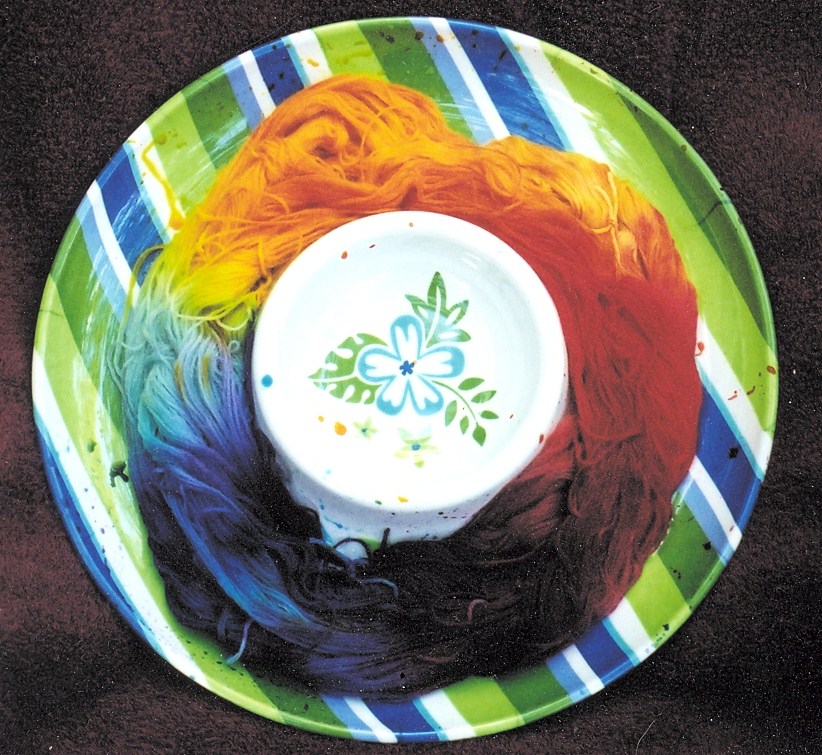
After the colors are just right, the skein of wool is carefully wrapped in cling wrap. This step can be quite challenging with rubber gloves on! The wrapped wool is placed in a microwave safe dish, then cooked on high for about five minutes. As the wool is cooking your house will begin to take on the odor of wet sheep and vinegar! Yum! The wool is allowed to cool, unwrapped, rinsed in the weak vinegar solution again, gently washed, hung to dry, and wound into balls.


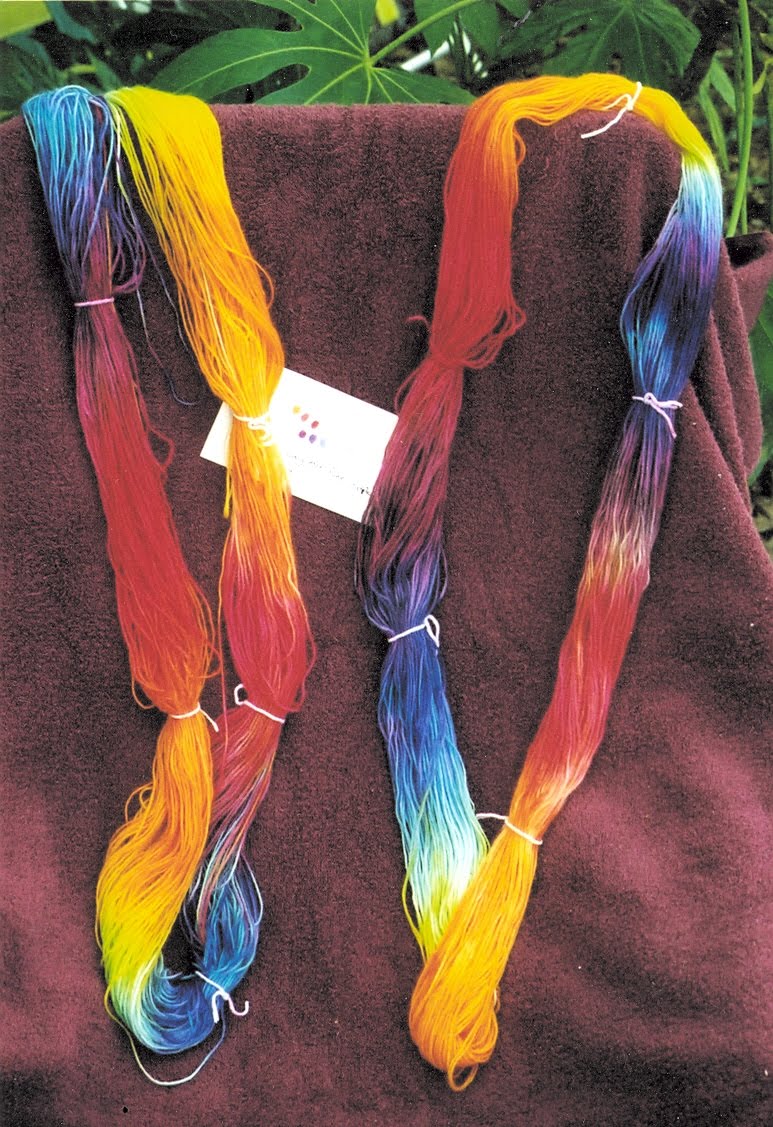
Finally you get to knit it into some awesome catkin socks!


CLICK HERE TO SHOP

Thursday, March 18, 2010

FAIR ISLE MITTENS


All through my high school years I was a very busy knitter. My mother used to brag to others “She’s so industrious!” when in fact she should have been saying “She must be really bored!” I do remember being bored a lot in high school, and knitting filled in the time. My school work was not very demanding (or at least I didn’t really care about it much). The big blocks of time that I could free up were spent with my horse, and the rest was either reading or knitting.

College was different. I found the academic work very interesting, but also demanding. My interests diverged. The horse was sold. What little free time I could find was spent singing in choral groups, spelunking (cave exploring), or traveling. I began to prepare for the career that would absorb the next twenty years of my life, training to be a geologist. Knitting was left behind.

Twenty years later I married a wonderful southerner, gave birth to a baby boy, and quit my job so I could stay at home to raise him (I do believe women can have it all, but maybe not all at the same time). Two more babies came to bless us in short order. Although there were times when having three children under six nearly drove me out of my mind, for the most part I enjoyed every minute at home with my babies. But I did need something to do with my mind and hands while I watched over them, so I knit them a few sweaters. They outgrew them in a month! Sometimes they outgrew them while they were still on the needles!

Eventually I began to try more ambitious patterns, and became completely fascinated with mittens for over a year! Mittens are fast, portable, colorful, and useful.


These at left are from Mostly Mittens by Charlene Schurch. Yikes! They seem to vibrate!


These at right are from Magnificent Mittens by Anna Zilboorg. My mother said I should use them to direct traffic!


And these (left) from Folk Mittens by Marcia Lewandowski.


I still enjoy making mittens, although I have moved on to other things. Right now I’m working on NHM #9 from Selbuvotter by Terri Shea. I’m using Dream in Color Smooshy Sock yarn. I love the colors, but the mittens turned out a little thin and insubstantial, so I lined them with soft Classic Elite Lush angora wool blend. Someone in my family will get these for Christmas next year, so don’t spill the beans!

To purchase hand dyed yarn and crochet thread from Sara’s Colorwave Yarns, click on the banner below.

Thursday, March 11, 2010

CROCHET THREAD TO DYE FOR


Introductory note: I have modified some of the photos in this post, including the one for the cute little bookmark above, to be linked to the pattern. Just click!

About a year after I had been successfully selling my hand dyed wool yarn on ebay (under seller name “shbknits”), a crocheting customer (you know who you are!) contacted me about putting pretty colors on crochet thread. At that time the variegated crochet thread available at the craft stores was pretty boring- pink and white, yellow and white, or blue and white. I was very hesitant to branch out in that direction for several reasons. For one, crochet thread is cotton. Dyeing cotton is a whole different process from wool which would call for new and different dyes, and vastly different techniques (which I wrongly assumed would also involve lots of boiling water). Furthermore, I couldn’t imagine what vividly colored crochet thread would be good for. In my naive and limited experience, crochet thread was used to make lace or doilies, and I had already learned the hard way that vivid colors tend to distract and obscure fancy stitchwork. I had already wasted part of my life knitting beautiful cabled sweaters out of brightly colored hand dyed yarn, only to find that the cables were all but invisible.

I decided to have a go at it anyway. I bought a tie dye T-shirt kit at a craft store, and tried my hand at a few cotton T-shirts just to get a handle on the process. It was quite disappointing at first. With the silk/wool process you put the dyes on the fiber until it looks “just right”, then set the colors with heat. After the dye is set, hardly any color will rinse out. With cotton dyes you have to put WAY TOO MUCH dye on the fiber, and then wait, wait, wait. Then it is rinse, rinse, and more rinsing. With T-shirts you can rinse in the washing machine, but not so with yarn or thread unless you want to end up with a big tangly mess. The rinsing must be messily, splashily, and sweatily accomplished in a big laundry sink or tub. You can only hope that 1) you put enough dye on the fiber to end up with the color you originally intended, which will probably (but certainly not always) be much lighter than the color you started with, 2) the colors that you end up with (which may not be the ones you intended) will actually look good together, 3) that you can get all of the splash stains out of the sink, floor, cabinets, clothing, etc, 4) that your elbow length heavy duty waterproof gloves don’t leak, and 5) that the local wastewater treatment plant never finds out where all that dye is coming from.


Thanks to Ellen for the photo at right.


What did I learn? People do use pretty crochet thread to make doilies, but the colors must be light and subtle or, if not, at least used sparingly. There is also a very specialized market for people who use crochet thread to make doll clothes! It is also great for baby blanket edgings, and even beaded jewelry!

Thanks to Janet for the photo at left, and to Sondra for the one at right.


To purchase hand dyed crochet thread from Sara’s Colorwave Yarns, click on the banner above.

Special appreciation is extended to my web genius guru, John Baldwin!

Thursday, March 4, 2010

COIN STITCH

I first learned to knit from my Aunt Jane when I was eleven or twelve. She gave me big sticky wooden needles and wool yarn in deep rainbow hues. I struggled away at garter stitch for a year or two before I really caught on. I learned to make simple shaping from one of those Coats & Clark’s How-to-Knit books that were so popular in the 1960’s (and only 35 cents!). I still remember the excitement when I made my first mittens- out of really awful mud brown Wintec Orlon Plastic yarn that I got at Woolworth’s. As my skills developed I purchased the “Woman’s Day Knitting Book” Magazine Number 7 (a comparative splurge at 60 cents), and tried my hand at some real female garments.

I was working on this sleeveless aran cardigan (click photo to embiggen) in bright yellow wool when Neil Armstrong walked on the moon! The matching "flared and flirty" skirt was in rainbow variegated. The outfit came out looking great, I was so happy! When I proudly wore it to school, unfortunately I learned how hot and itchy cheap wool yarn is against the skin. What was I thinking?! Why would anyone WANT a sleeveless wool aran cardigan and a knitted miniskirt anyway? Gaaah! Fashion!


In the same magazine was this charming baby sweater with a sort of quilt or puff stitch. At that time I was about 16, and didn’t have any close contacts with babies, so I wasn’t motivated to struggle with this pattern. Many years and three babies later, I gave it a whirl, and loved it! This charming stitch pattern is known in Barbara Walker’s stitch dictionaries (my Bible) as Blister Check or Coin Stitch. It is very soft and versatile. Since it is based on a multiple of only 4 stitches, it adapts well to many patterns—hats, mittens, even socks! I have reproduced the two-color version for you, just scroll down below the photos.


Blister Check or Coin Stitch from Barbara G. Walker, A Treasury of Knitting Patterns, 1968. (Book for sale HERE)

In this pattern the drop-stitch technique is used to make a very attractive fabric with the double interest of color and texture.

Multiple of 4 stitches plus 1

Colors A and B. Cast on with A and knit one row.
Row 1 (Wrong side)-- With A, purl.
Rows 2 and 4—With B, knit.
Rows 3 and 5—With B, purl.
Row 6—With A, k2, *drop next st off needle and unravel 4 rows down, picking up the Color A st from Row 1 below; insert needle into this st and under the 4 loose strands of Color B, and knit, catching the 4 loose strands behind st; k3; rep from *, end last repeat k2.
Row 7—With A, purl.
Rows 8 and 10—With B, knit.
Rows 9 and 11—With B, purl.
Row 12—With A knit 4, *drop next st, unravel, and knit Color A st from 5th row below in Row 6; k3, rep from *, end k1.
Repeat rows 1-12.